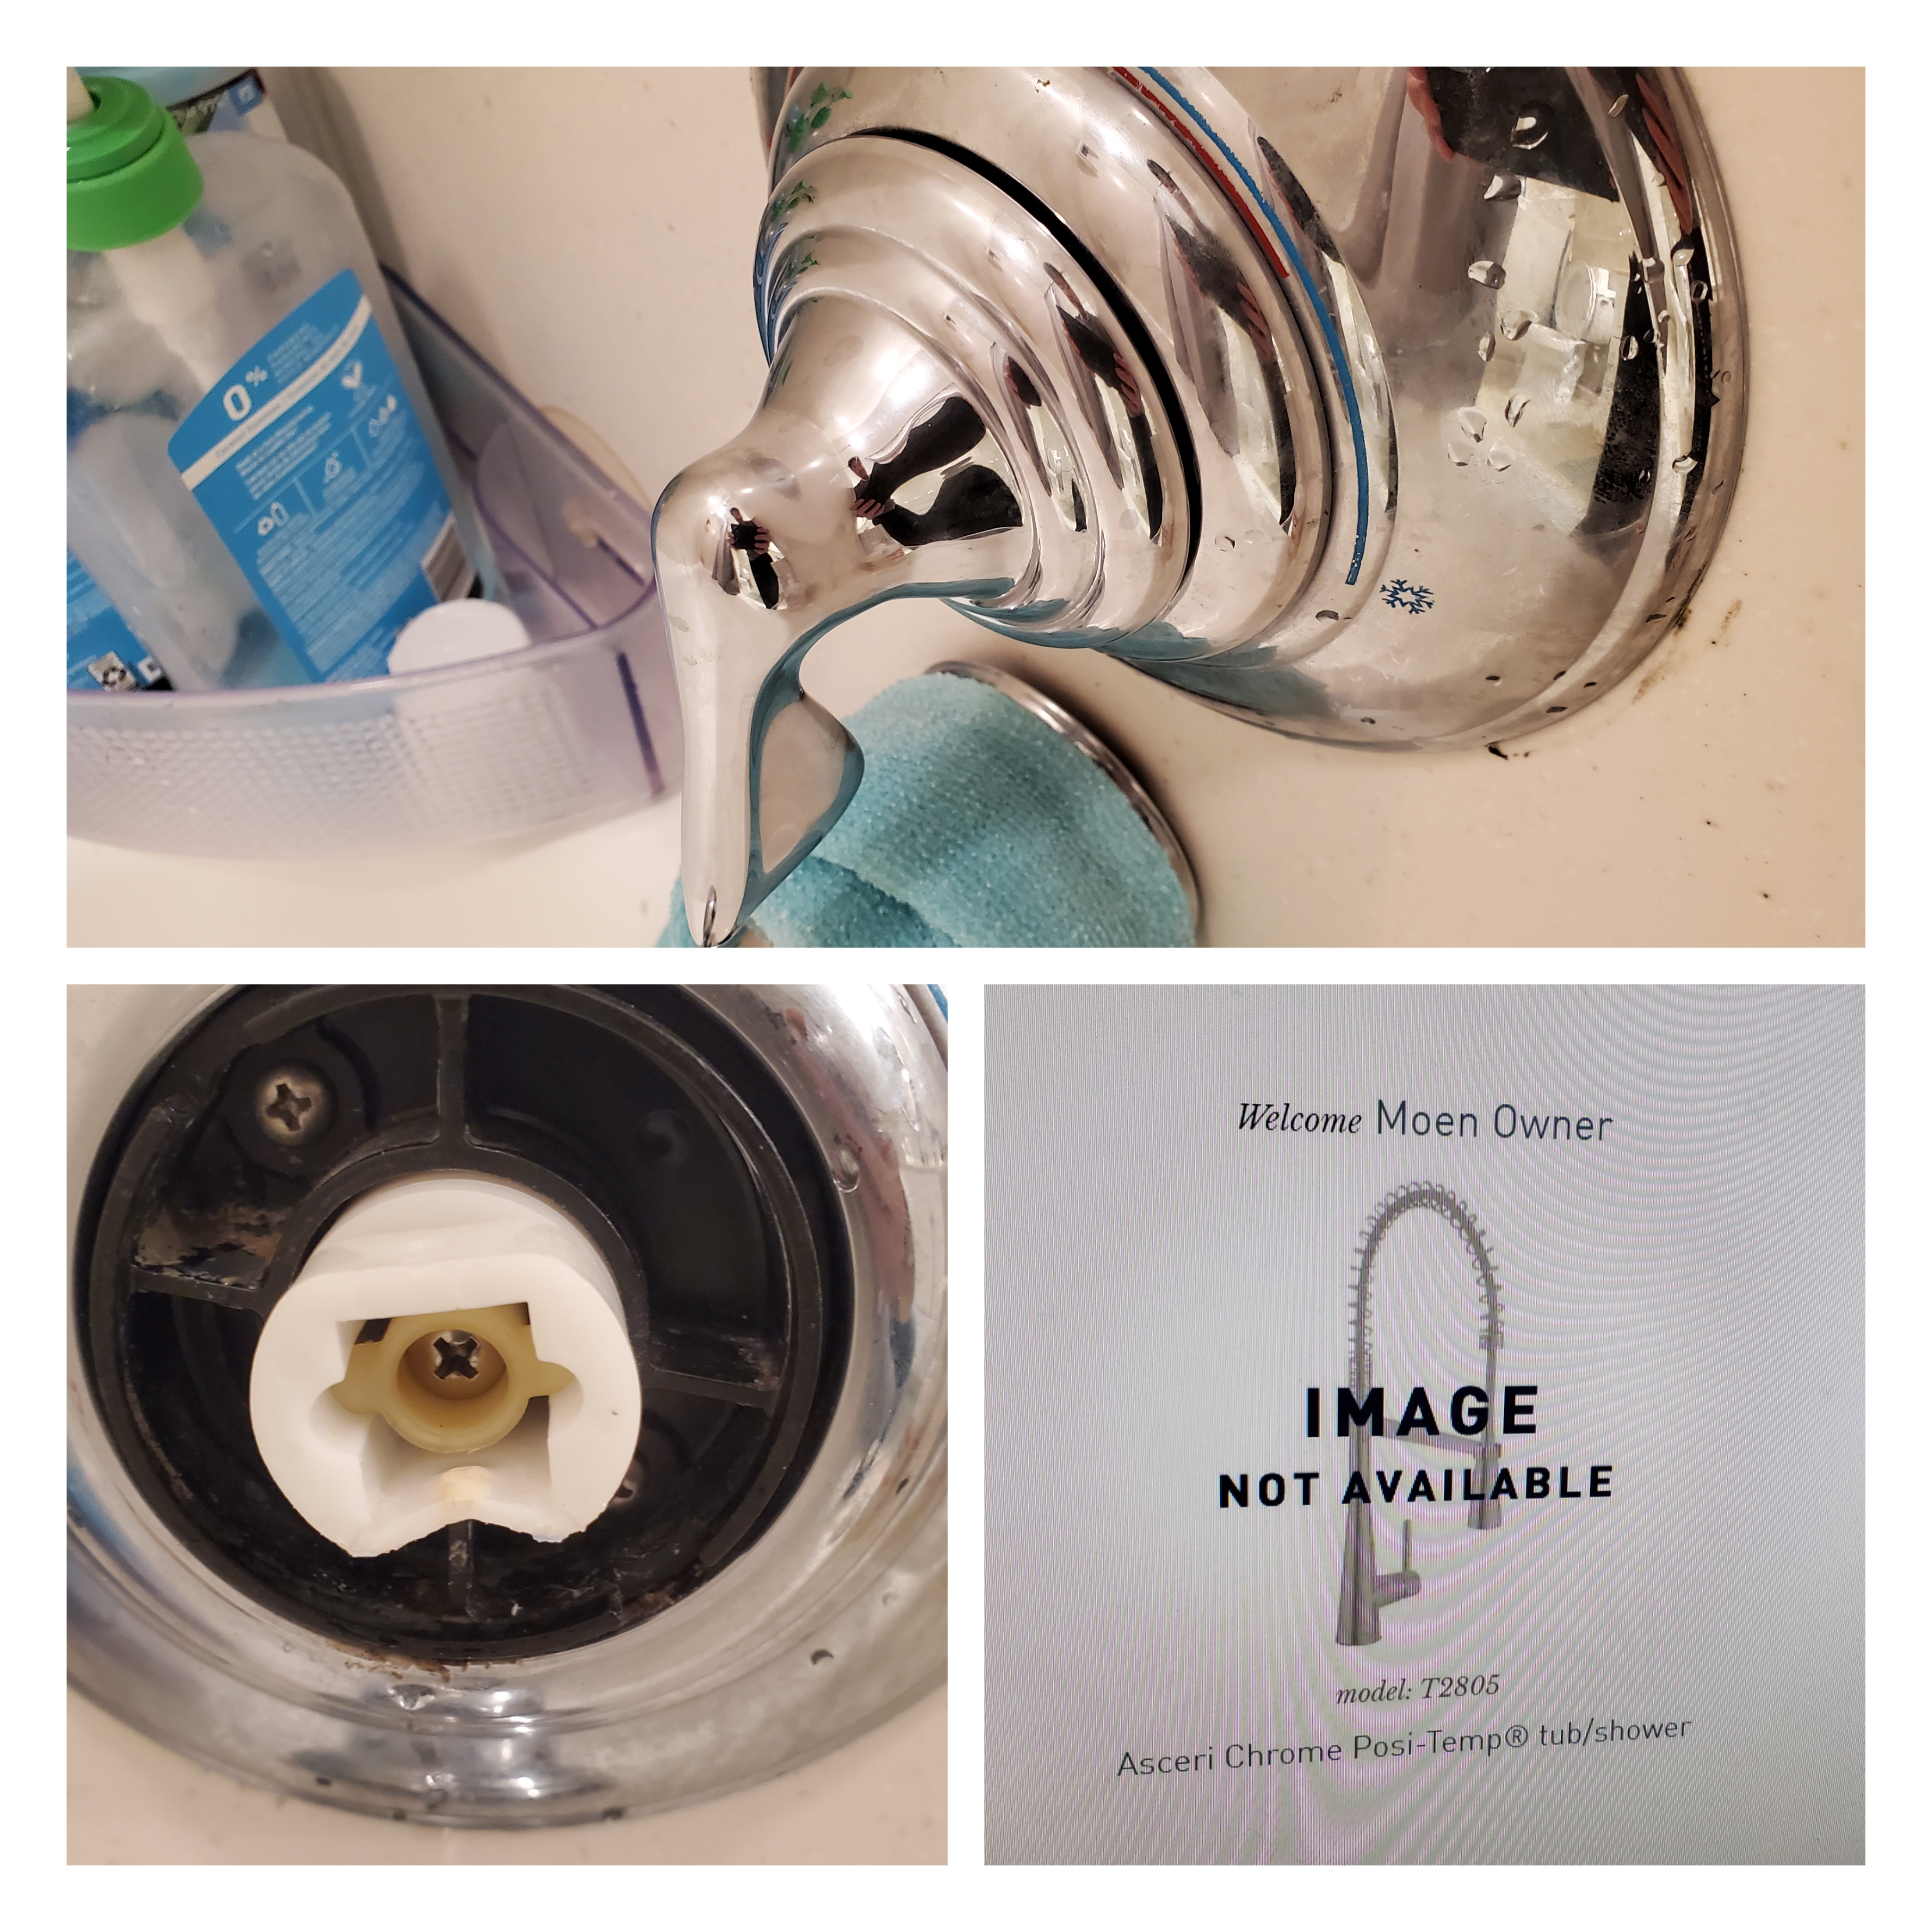
Gone thru a long journey with long existing problem 🙂 The bath tub handle at this house was a bit shaky since we bought this house like 8 years ago – required occasional forced pushing with hex.
However, this year finally we reached the moment further pushing in the handle didn’t work any more (as the housing plastic part became bended and even broken) – because we have more forceful (& also less careful 🙂 ) users in the house breaking the handle every day – so finding the parts and finding the right place to order was a journey
Luckily Moen who was the manufacturer of this old handle still have a good system like upload a picture and they will tell what it is – Amazing 🙂 but since this is too old and not a regular item to fix finding the part was hard 🙂
As this is old version, finding the part requires going thru less generic sites and the price had wide variations like 15-75 dollars 🙂 but this time found a deal at totally unknown zoro.com so tested the luck. (and failed hard as the order to delivery took 1.5 months and multiple emails)
Finally no more dings on the tubs is expected – so now I need to find a way to patch the dings on the tub
이집은 사실 이사올때부터 욕실의 핸들이 좀 헐렁했다.. 그래서 주기적으로 육각쇠로 쪼여주었건만… 결국 이제는 내장 부품이 휘다못해 깨지고 우리집 다른 분들이 덩치가 커지며 힘이 세지셔서 허구한날 핸들을 뽑고.. 돌리다가 욕조 바닥에 떻어뜨려서 욕조 바닥에 사방에 상처를 내주시는 바람에.. 도저히 못참고 이걸 함 해결해보겠다고 난리를 쳤다..
문제는 당최 언제 어디서 샀는지 알수 없는 욕조 핸들 부품을 찾기부터 시작 – 다행히 제조사에서 사진을 올리면 정확한 품번을 다 알려주는 신박한 서비스가 있어서 그것부터 시작했다
다음 문제는 관련 부품을 찾는것… 뜯지 않고 어디가 망가졌는지를 학인하고 그 부품을 어떻게 찾을건가 싶긴했는데 다행히도 사진에서 알려준 제품 정보로 파트 정보까지 확인.. 허나 너무 오래된 모델이라 부품이 제조사에서도 없는 바람에 결국 여기저기 전문 사이트를 돌다가 엄청난 가격차이에 놀라고 (15불부터 75불까지 사이트마다 각양각색..) 결국 제일 저렴한 사이트인 zoro.com에 주문해봤는데 당장 재고가 있는척하고 광고하더니만 한달반을 기다리고 몇번을 고객센터에 지X을 한후에 겨우 받았다… ㅎㅎ
결국 부품을 받고 한참을 살펴보면서 뭐가 깨졌나 싶었는데 막상 뜯어보고 풀어보니 생각보다 심각한수준이었다.. 분명이 있던 클립 하나는 우리집에서 알수 없는 분이 지난 주에 날려드셨고.. 뜯고 보니 무작정 돌아가는걸 막아주는 부품은 아예 없이 설치가 된건지 아니면 우리가 날려드신건지…ㅎㅎㅎ 뾰족한 조립 절차 문서도 없어서 reverse engineering의 관점으로 새부품을 여기저기 살펴보고 (심지어는 망가트린줄 알았음…) 결국 뜯고 나서 하나하나 고심하며 설치했다가 다시 빠지길래 다시 빼고 자세히 보고나서 성공적으로 교체 조립해주었다..
휴… 몇년 묵은 체증이 싹 가시지만 이제 그동안 핸들이 떨어지며 사방에 상처입은 욕조의 상처들이 눈에 들어온다..ㅎㅎ
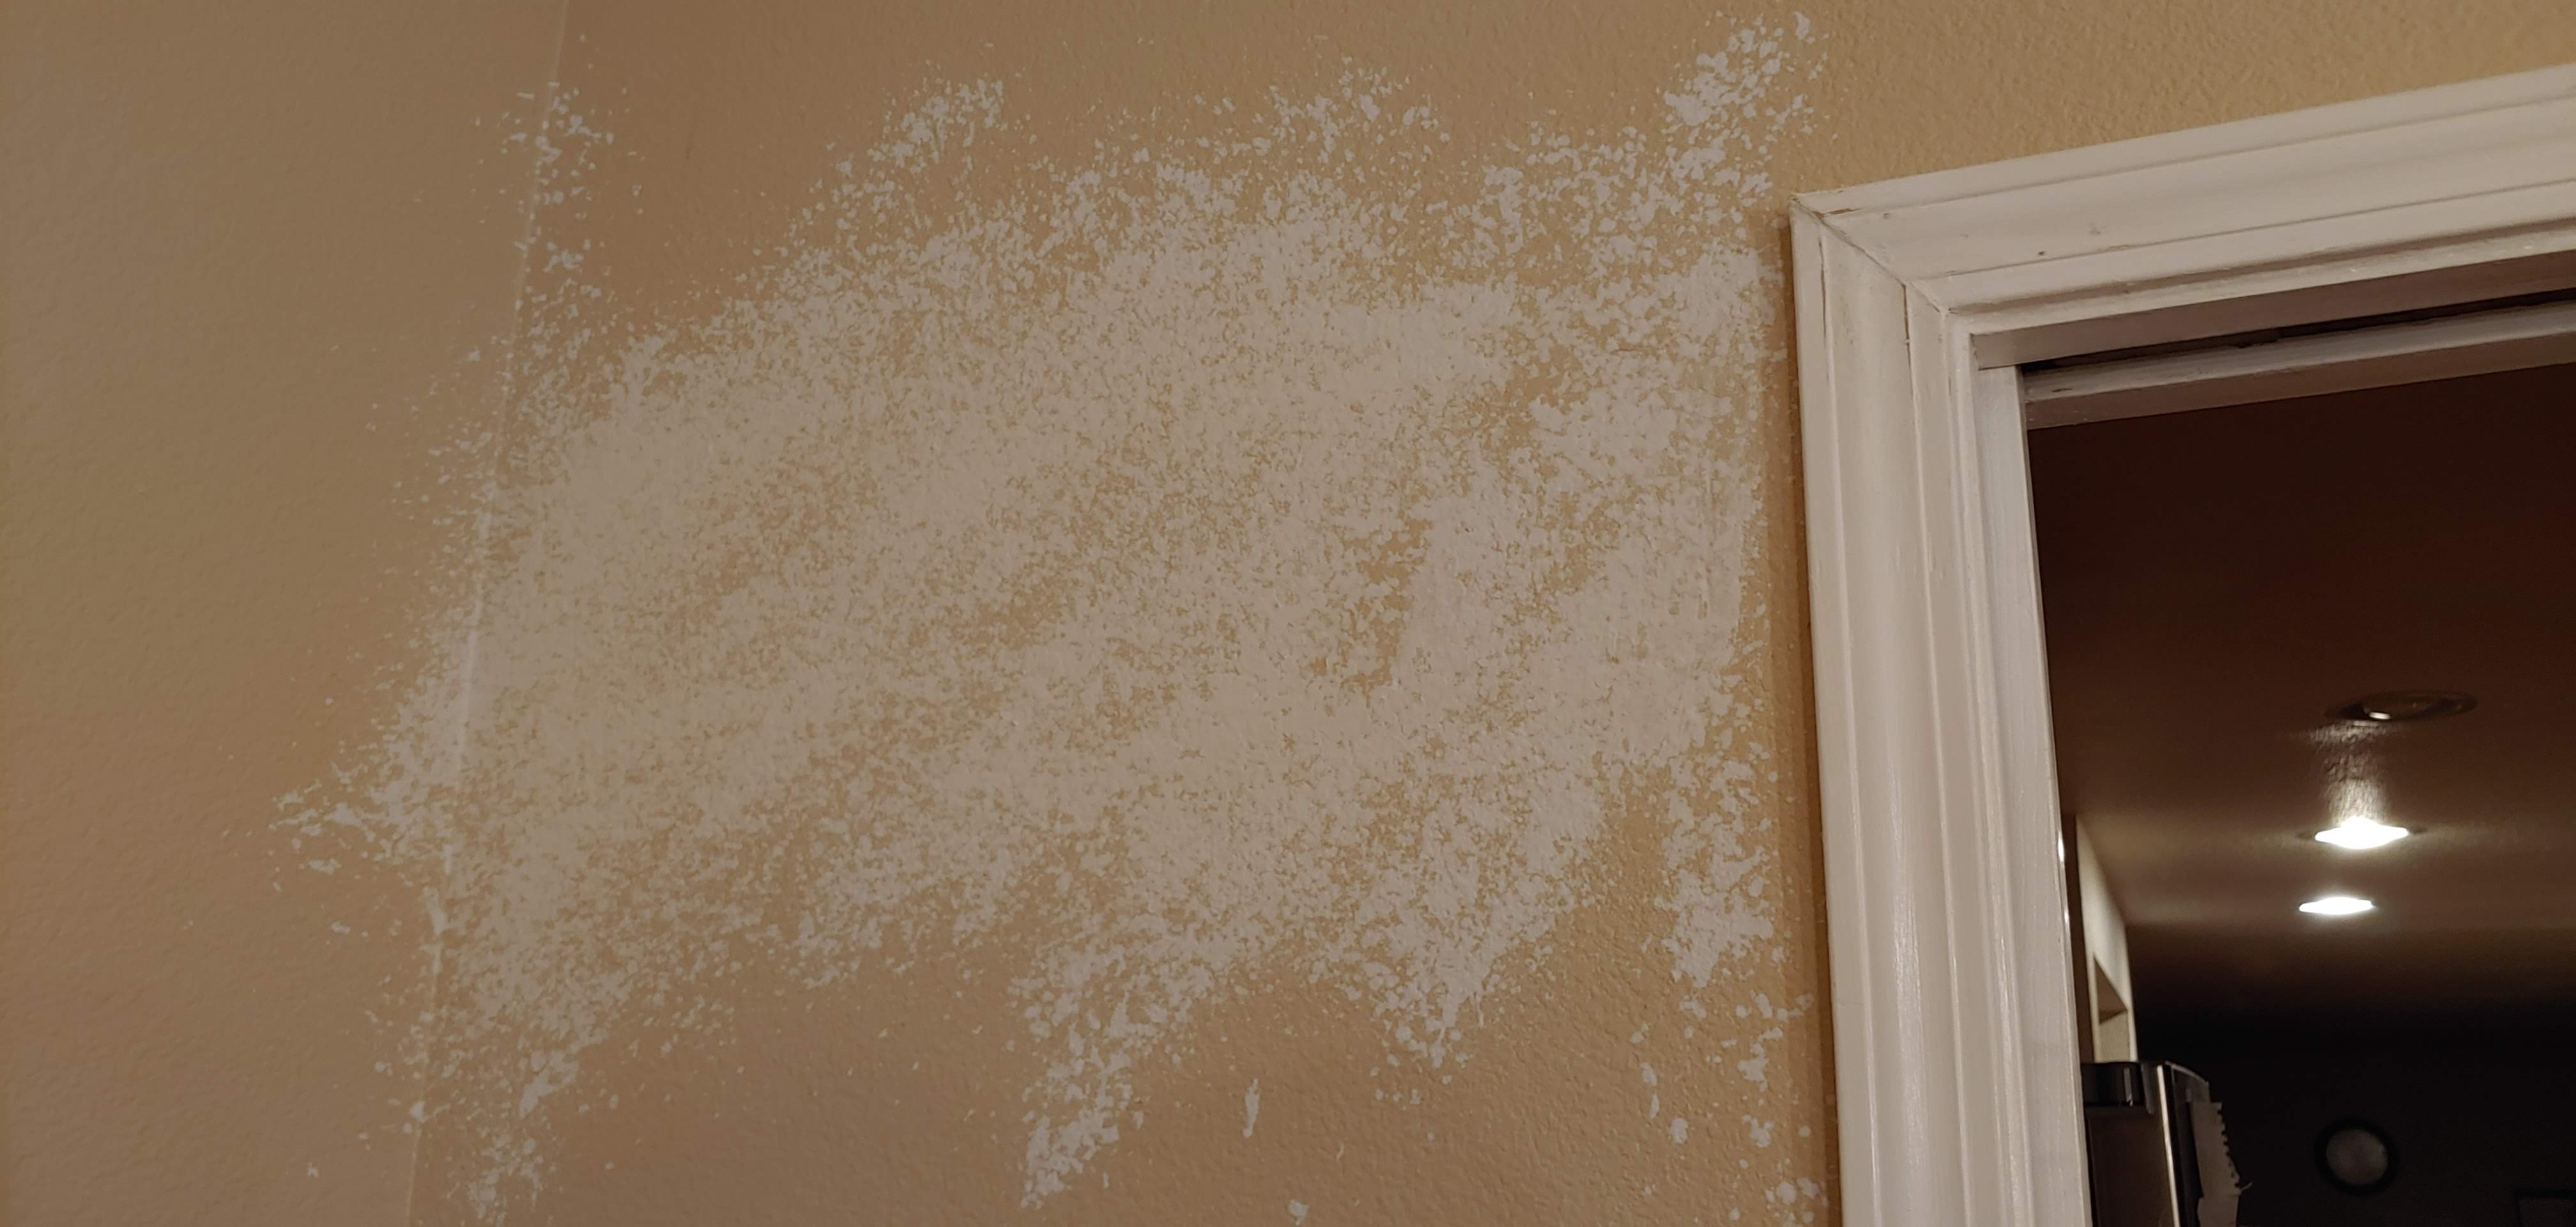
얼마전 우리집 큰분께서 본인 말씀으로는 의자에서 넘어지는걸 안넘어지려고 하다가발이 헛나가 벽에 큰 구멍을 내주셨다…
아마 승질 부르다 그러셨을수도 있겠지만 그냥 삐딱하게 의자에 누위있다 발생한 사고라고 생각하는게 내 정신건강에 좋으니…..그리 생각하려는데…
어쨌건 덕분에 Youtube에서 집고치는 영상을 좀 보다보면 꼭 보게 되는 게 결국 벽수리다…ㅎㅎ 이 나라 목조 주택들은 나무기둥에 석고 보드를 연결하여 붙이는게 벽의 대부분이라 결국 7/8 (나무 기둥들은 보통 16인치 간격이고 나무기둥은 보통 2인치 이니) 확률로 사고 발생시 뒤에가 뻥뚤리는 참사가 다량 발생하는듯….
그래서 이걸 수리하는 방법은 여러가지가 있긴 한데 단순한 구멍은 그냥 매꾸기가 쉽지만 이번에는 주먹 두개 사이즈로 거의 누운 8자로 뜯겨 나가서
일단 뜯겨진 부위 + 헐거워진 부위를 대충 네모 모양으로 정돈
하드보드 (석고에 종이가 붙어 있다..) 를 같은 살짝 작은 정도의 비슷한 모양으로 칼질을 한후…그냥 뜯는게 아니라 팍 충격을 줘서 석고만 뜯어내고 한쪽 종이는 붙어있게 틀을 잡아 주심
그 다음 매꿔지는 주위 및 종이 안쪽에 “mud” 석고 점액을 발라서 기존 벽면에 압착…
그래서 매꿔지는 부분과 네모로 만든 기존벽의 석고 보드 사이와 외부 종이와 기존 벽 사이에 이 점액이 굳어지고 그 위를 석고 점액으로 잘 발라서 티안나게 만드는 게 요지다…
뭐 정확하게 모양내고 자를 다음 뒤에 나무판 대고 나사를 박아서 고정해 주는 방식도 있긴 한데 그냥 이게 더 신박할거 같고 어차피 이번에는 새로운 보드로 매꿔야 하는관계로 이 방식으로 시도..
암튼 일단 1차 작업 완료… 이제는 사포질 해서 튀어나온 부분 정리해주고 벽면 오돌돌한거 만들어주고 (aka orange peal texture) 페인트칠도 해주셔야 한다…OTL
Finally – and unfortunately – had a chance to apply California Wall Patching – which I have seen in many Youtube home repair videos – at my home.
Until now, all the drywall repairs I have made in various instances have been mostly with simple spackling fill. While this time our big guest made a two-fists wide damage and the broken pieces were not reusable at all so I decided to use new drywall board pieces with California patch which connect paper part and board gaps with joint compound.
As usual, things have been always more difficult than video but finished the first portion of repair – now I need to sand and apply the texture then paint it again – so I wondered whether I should smile or cry… 🙂
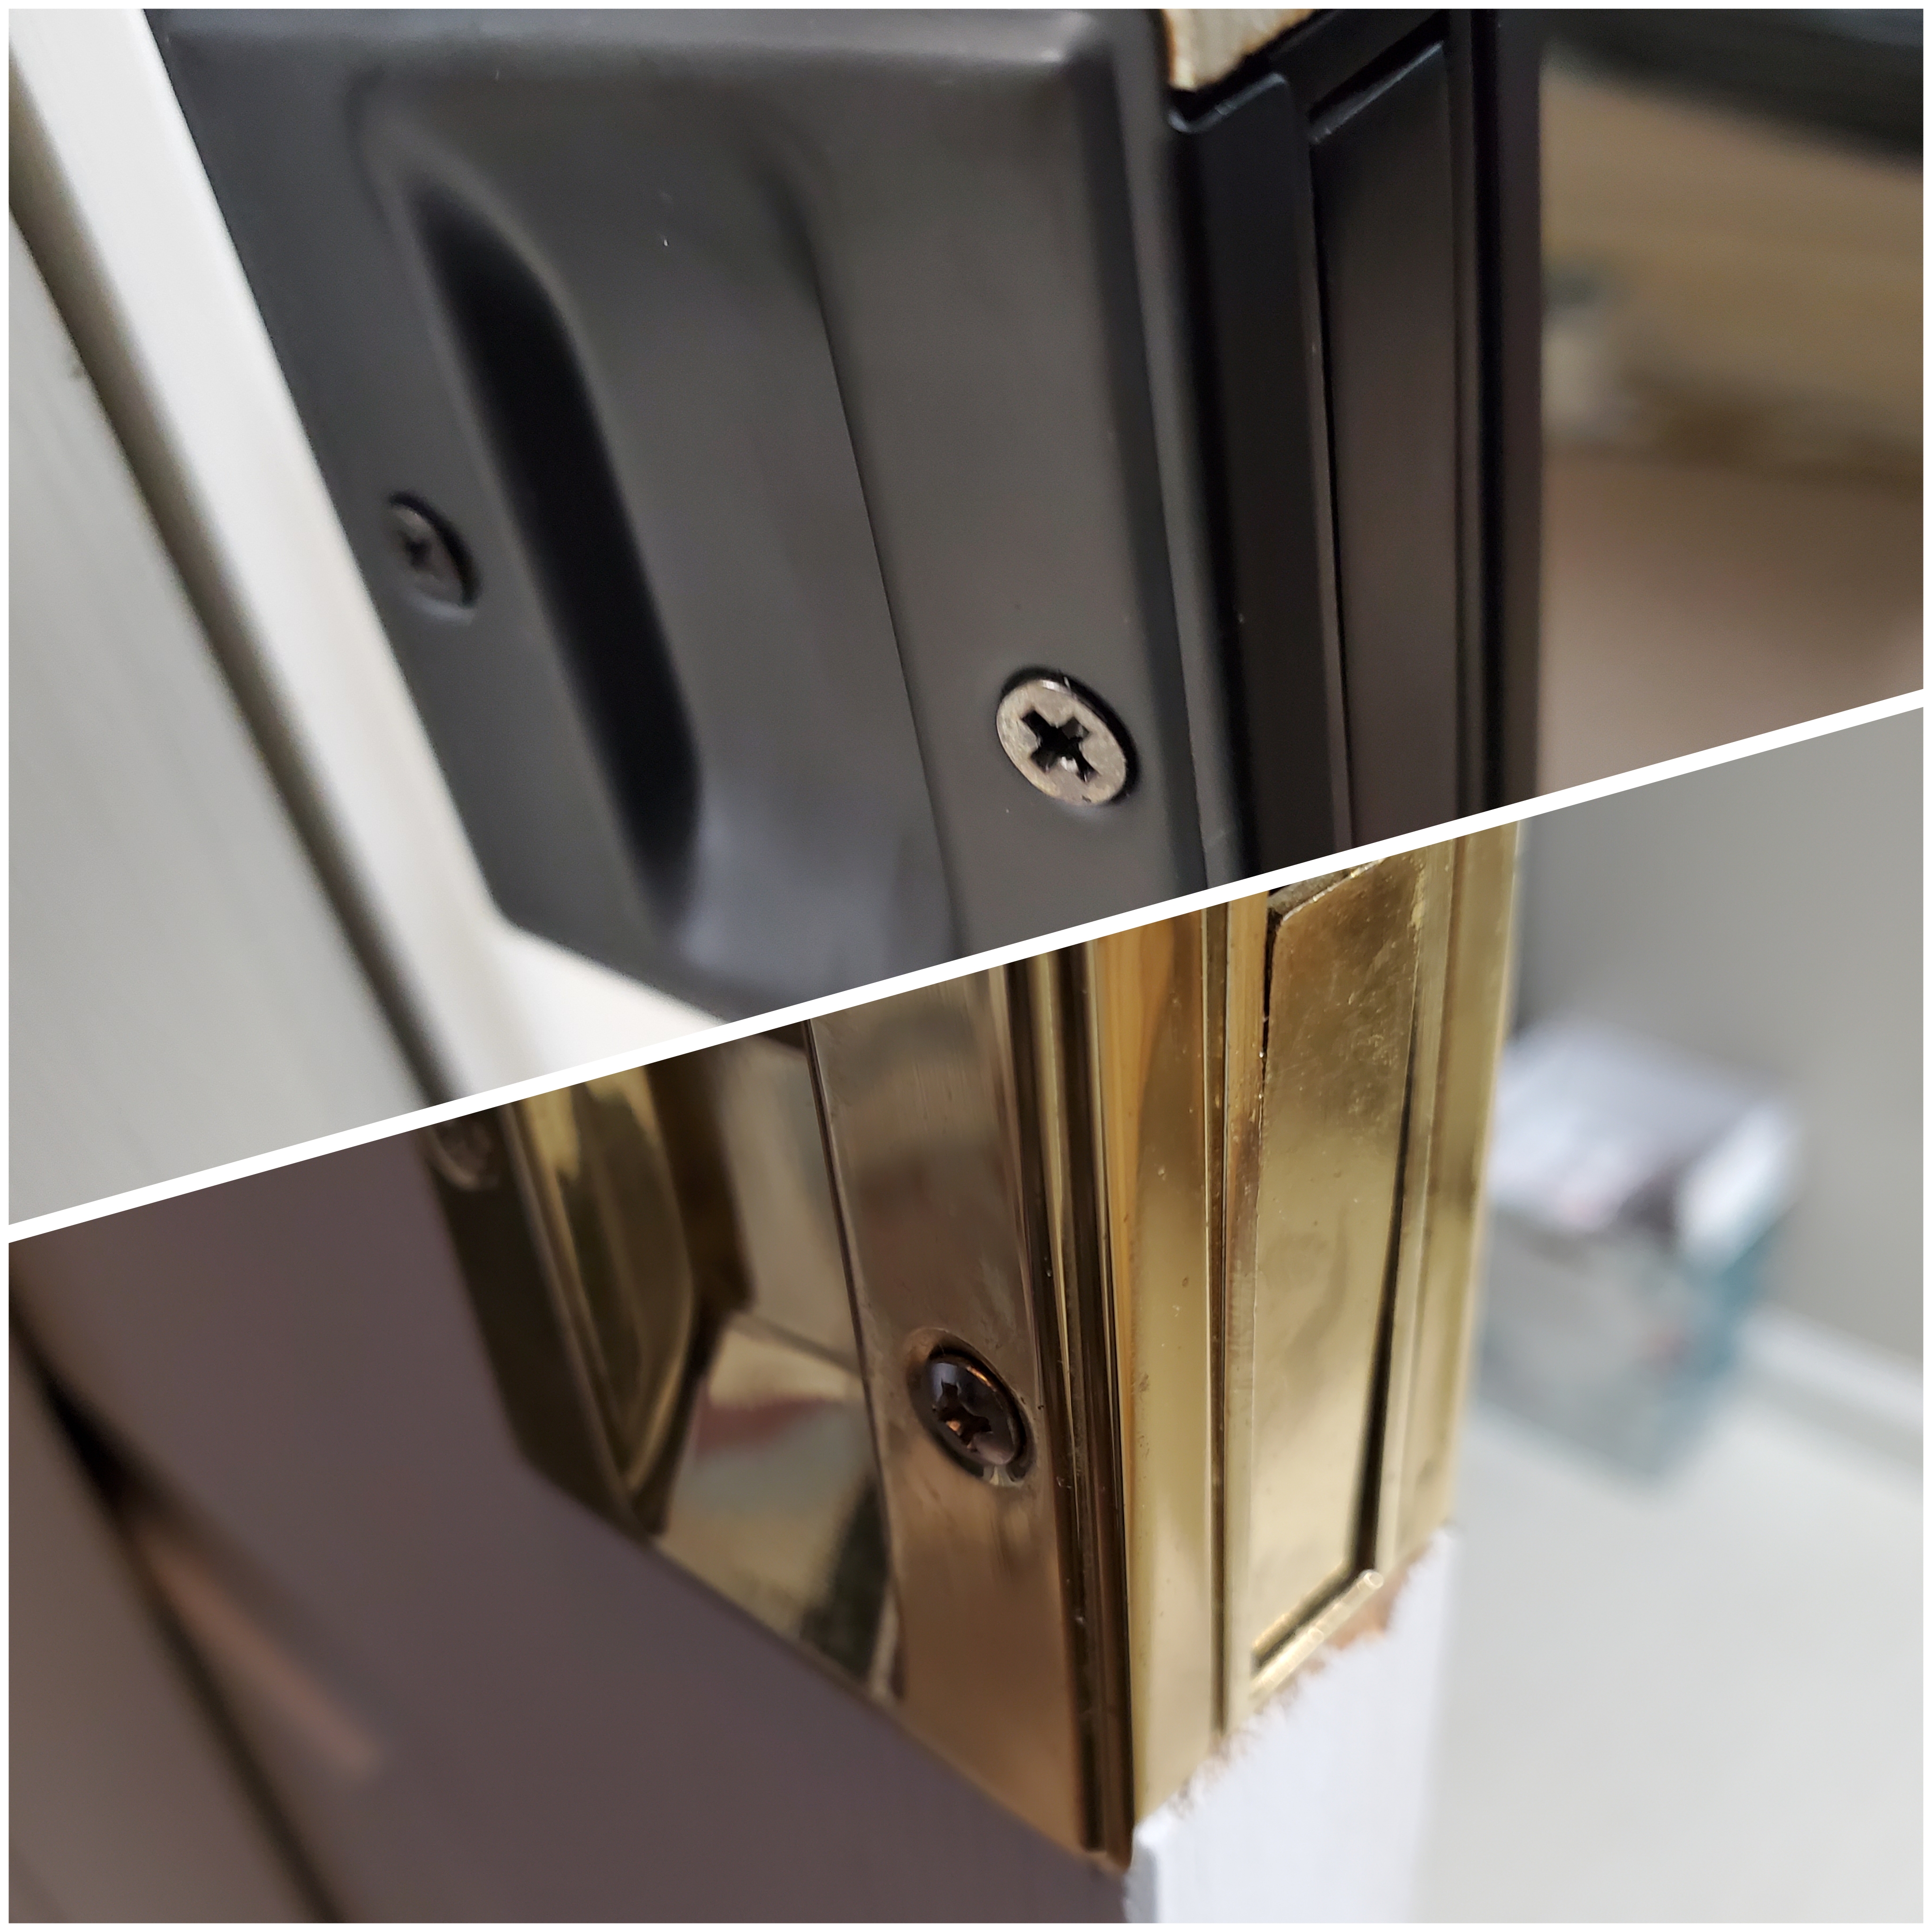
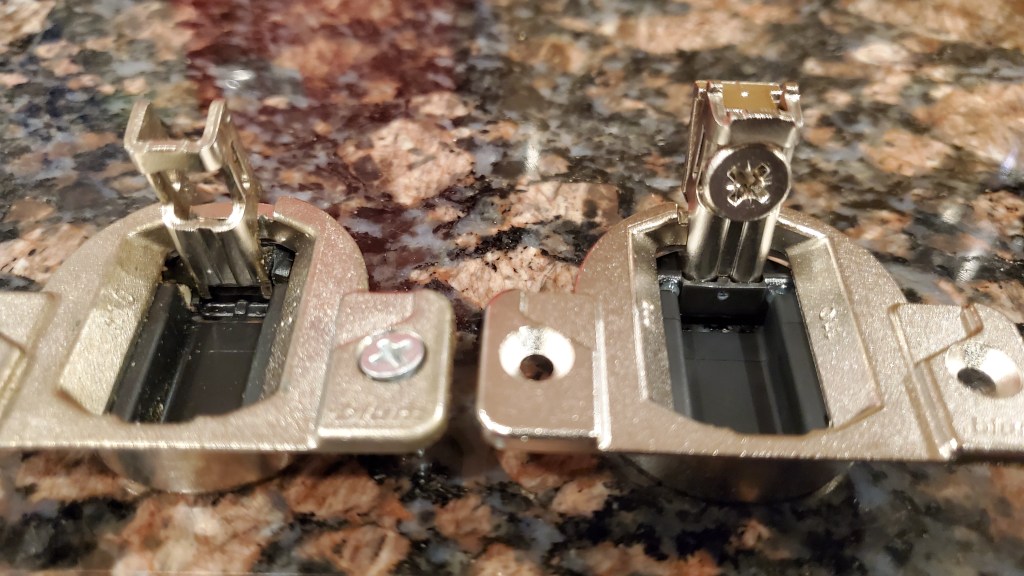
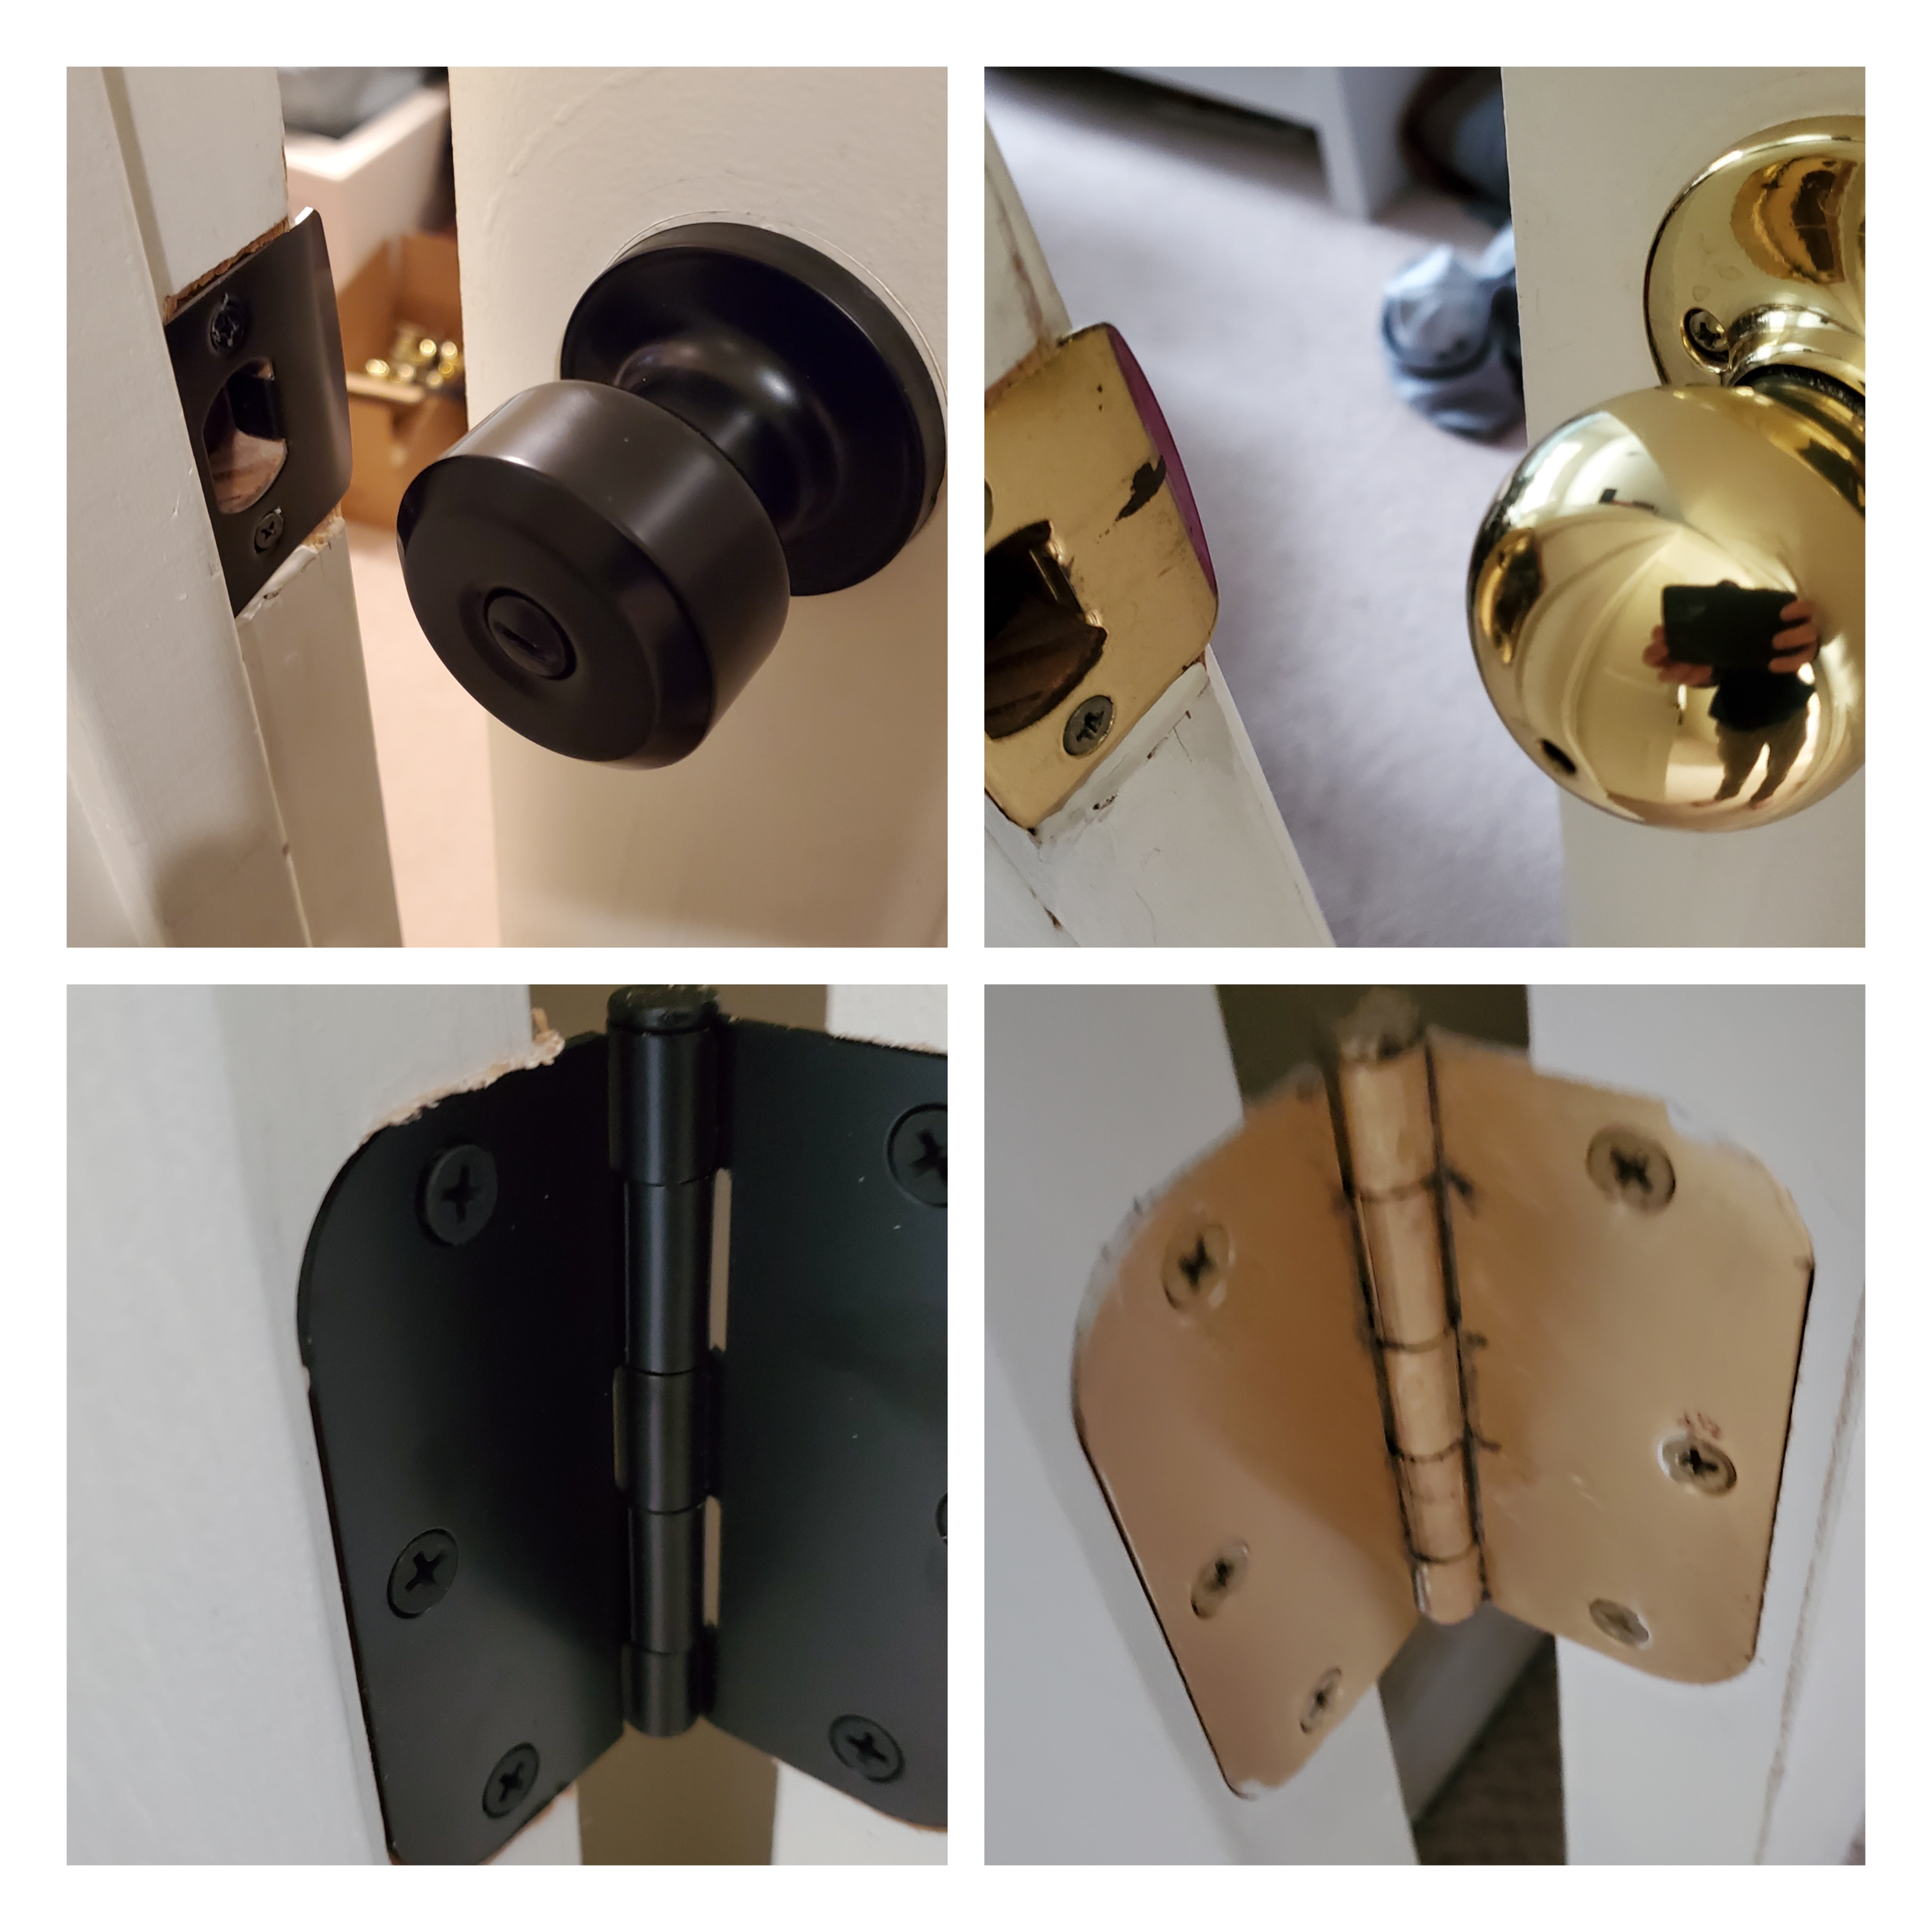
사실 2년만에 집에 돌아왔더니 캐미넷 문짝이 하나둘씩 한국식으로는 쩍벌을 영어식으로는 고스트 도어놀이를 시전해주고 계셨다…
사실 처음엔 이유도 잘모르고 자석으로 고정해볼까도 했는데 그것도 정밀하게 맞추지 않는이상 되다 안되다하고..작은 부위에 나무를 뚫어고정하다보니 수정도 거의 불가능하고 결국네번 째 문짝께서 소리없이 쩍벌을 하셔서 또 유투브질과 아마존질을 같이해서 노동질을 해주었다…원인은 사실 간단…절대 이해는 되지 않아 속는셈 치고 믿고 따라했더니 정말 속시원하게 문이 닫힌채 있으시다…(문닫힌 것에 속시원해버린 기분…ㅋㅋ)
원인 파악이 어려웠던건 망가지는 부위가 어디인지 도통 찾기 힘든 요인이 있었다…위 사진 두 개중 어느것이 고장난 것이고 어느것이 새것인지 찾을수 있는분껜 존경을 보낸다..ㅎㅎ (게다가 이걸 떼지 않고 찾기란…)
역시 문송인한테는 살기어려운세상이다…ㅎㅎ
After having ghosting cabinet one or two doors for years and now the count reached total four, so I decided to dig thru to solve the problem.
Definitely not easy thing to start as identifying the broken piece in this small but delicate fine mechanical system was not easy.
Finally after adding my laboring on top of some Youtubing and Amazoning finally all doors’ ghost disappeared. And felt so funny to realize the fact that peace of mind has come from the cabinet door stay closed and firm 🙂
누군가 그랬다… 엔지니어링 또한 문제 해결을 위한거라고… 비전공자로서 그럴수도 있겠네 했는데…제대로 체험삶의 현장(?); 나같은 어정쩡한 문송인에게 세상은 점점 어려워진다..
작년에 복잡다단한 이유로 시원하던 집 놔두고 동네의 타운하우스에 이사를 왔건만… 첫 여름을 지나면서 아무래도 타운하우스는 좀 덥지 않을까 싶었는데.. 하필 옆집이 에어콘을 설치한 집인데 실외기를 이쪽 집 문가에 설치해주는 만행을 저질러 주셔서… 정말 더울때 문을 열어도 옆집 열기까지 더해져서 더 더워지는 참사가 계속 되었다… 결국, 이 집에 1년더 살기로 하고 여름에 킬 포터블 에어콘을 주문했다..
근데, 에어콘을 보니 이나라에서 파는 포터블 에어콘은 다 위-아래 창문에 한켠을 막아서 공기를 내뿜는 구조의 공기배출 시스템이건만, 하필 이집에는 거실에 위아래 창문이 하나도 없고 미닫이 문만 있는구조..ㅎㅎㅎ Youtube로 여러 연구 결과 (벽에 구멍을 내고 밖으로 빼내는 옵션도 있으나 여긴 우리집이 아니기에 pass, 즉, 철이 지나면 쉽게 철거가 되고 티를 내지 않는 해결안이 필요) 결국 수직상황에 적용할수 있다고 하는 제품 kit를 아마존에서 주문했다.. 허나 kit을 배송받고 보니 문제는 1) LG가 배출구가 표준이 아니고.. 2) 수직에할수 있다지만 미닫이 창에 최적화되어 있어 이걸 문에 적용하자니 주욱주욱 늘어트려야해서 너덜너덜하고 안정성 제로..
아쒸… 결국 1)은 PVC를 깍아 해결하고 (도데체 kit는 뭔 역할인가 싶고.. 내가 “생쌀을 재촉한다고 밥이되냐”고 외치던 방망이 깍던 노인인가 싶음..) 2)는 비슷한 문제로 어떤 Youtuber도 참다 못해 frame을 완전히 나무로 짜버리고 kit을 나무에 끼운걸 만드는 걸 보고 아이디어 참조하여 미닫이 문 홈에 딱맞는 2×2목재를 사와 일종의 외벽 고정하면 되겠다 생각해주심.. 결국 2×2사와 높이에 맞게 잘라 홈도 파고 문을 닫을때 접촉하는 한쪽면을 덧댔는데 여전히 이넘의 kit는 춤을 춘다. 자세히 보니 결국 문 끝 안 쪽홈에 lock장치로 튀어나온 부분이 있어 kit가 안정적으로 수직 고정이 되지 않아 춤을 추는듯…
결국 2×2 목재를 하나더 사오고 kit다른 쪽에도 목재를 받힘해주고 결국은 kit옆면에 구멍내고 screw로 고정해주니… 드디어 고정체로서 안정성을 확보했다.. 허나 목재가 살짝 비틀어져있어 문을 닫으니 문과 목재사이에 gap이 있고 여전히 kit와 목재 사이도 어쩔수 없이 gap이 있었다..
이 비싼 찬공기를 희석시킬수 없다는 생각에 결국 바람막이 고무 붙이기도 동원하고 문 바깥쪽에는 나무를 하나 덧대서 목재와 문사이의 gap도 해결하고 kit중간중간에 보이는 공간도 다 막았다.. 그리고 한동안 lock을 할 수 없으니 방범용으로 문사이에 낄 나무도 잘라서 손잡이 달아주고..ㅎㅎ
근데, 다했다를 외치려한 순간 다시 보니 문이 완전히 닫히지 않는 관계로 고정된 문과 vent때문에 완전히 닫히지 않는 문의 frame과 frame 사이로 공기가 술술 잘통하고 있는걸 발견하고 여기도 바람막이 고무를 동원하여 드디어 성공…T_T
이번 여름은 시원하게 날란다.. (아니 내 골방/cave는 어차피 시원하니.. 가족들이 덥다고 하는 성화가 없어지기를..ㅎㅎ) 역시 홈디포와 아마존이 승리..
이제는 저 나무를 이제 하얗게 칠해야 하나 아님 그냥 눠둘까 고민중이시다..ㅎㅎㅎ
One thing encountered after moving in current place in last summer was this place is hot in Summer 🙂 – Part of it driven by Townhouse structure and also next door neighbor’s air conditioner vent was installed right next to the siding door of our place; hence opening the window/siding door never helped or even made worse in hot summer days.
After long thoughts and landing a plan to stay at this place for one more year, purchased expensive LG portable Air Conditioner. Now, the problem is how and where to install the vent, and making it worse, this home doesn’t have a horizontal or up-and-down windows, leaving the only option as installing the vent at siding door. (plus as a rental house had the solution shouldn’t impact the main structure of the house and should be easy to remove when season is over)
As all the portable air conditioner assumes up and down windows, had to find the solution to have vent at tall siding door, but luckily found there is something at Amazon for this.
However, this was not sturdy enough (PVC) or very loosely standing – likely because this is optimized for siding window – not turning out to be a long lasting option (had to do adjustments almost every time we turn the conditioner on) and also the default vent didn’t fit with LG’s outlet.
So had to take several actions
– Hand cut the vent to fit the LG outlet with knife and hand saw
– Buy and cut the 2×2 lumber and cut + make a rabbit cut at the bottom to fit into the door’s rail
Then forced to snug the vent kit between the door and inserted wood – but kit was still unstable as the door’s lock installed at the end of door wasn’t providing angled & straight support to the kit.
So bought one more 2×2 had it as a place holder at the door’s end and inserted the vent kit between 2x2s; worked well but vent kit was still dancing around and had tons of gaps to let air flow in various locations, and – as expected- 2×2 not being straight/square also generated sizable gaps between door and 2×2 when closed.
To solve these next set of troubles, drilled between the kit and 2×2 and screwed it to make it sturdy; adding one more layer of wood at outside to close the gap between door and 2×2, + applying weather stripping to seal the gap around the vent kit and 2×2 and also applied the weather stripes on inner frame gap (between the moving door and fixed door), and also cutting the 2×2 for security lumber as the lock will not work during the times we have this vent. 🙂
Although not having ever been an engineer, reminded me engineering is all about problem solving 🙂
Now the question is – shall I paint the woods to white to match or not 🙂
Our pocket door has been broken from the 2nd month after we moved into this house after some kids attempt to push it instead of slide it.. 😦
Well – my first attempt, after about a year of sad hanging, was changing the roller but only lasted shortly – it lasted short as the side-rail was bent and didn’t completely closed the door as door was taller than it should be – out of adjustable range
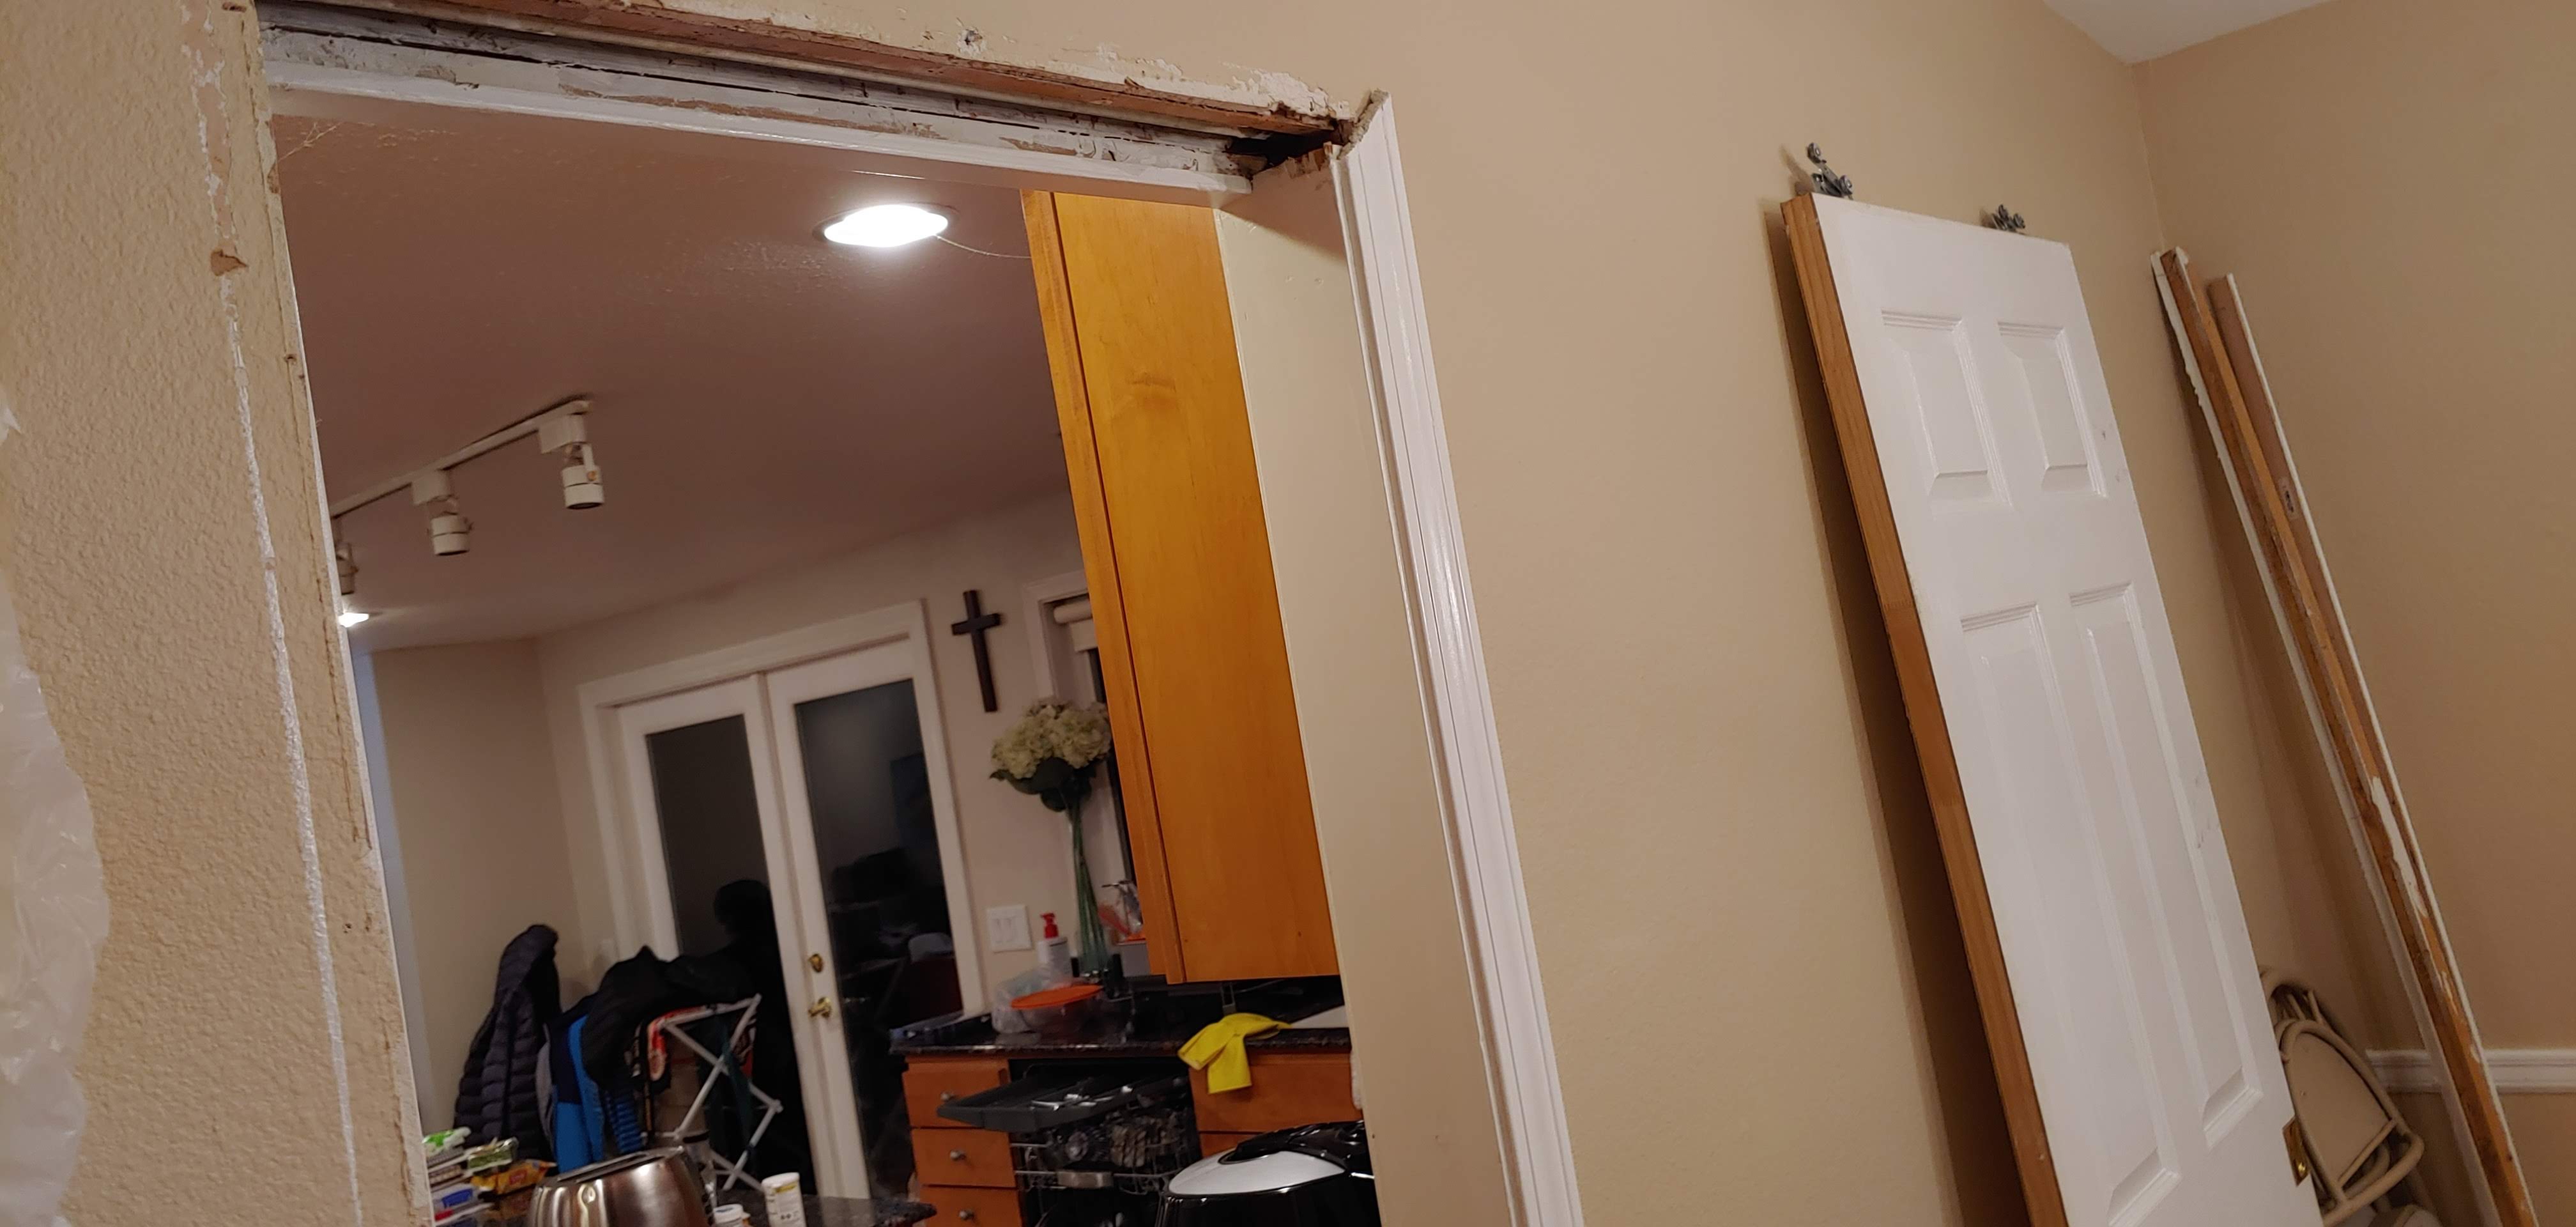
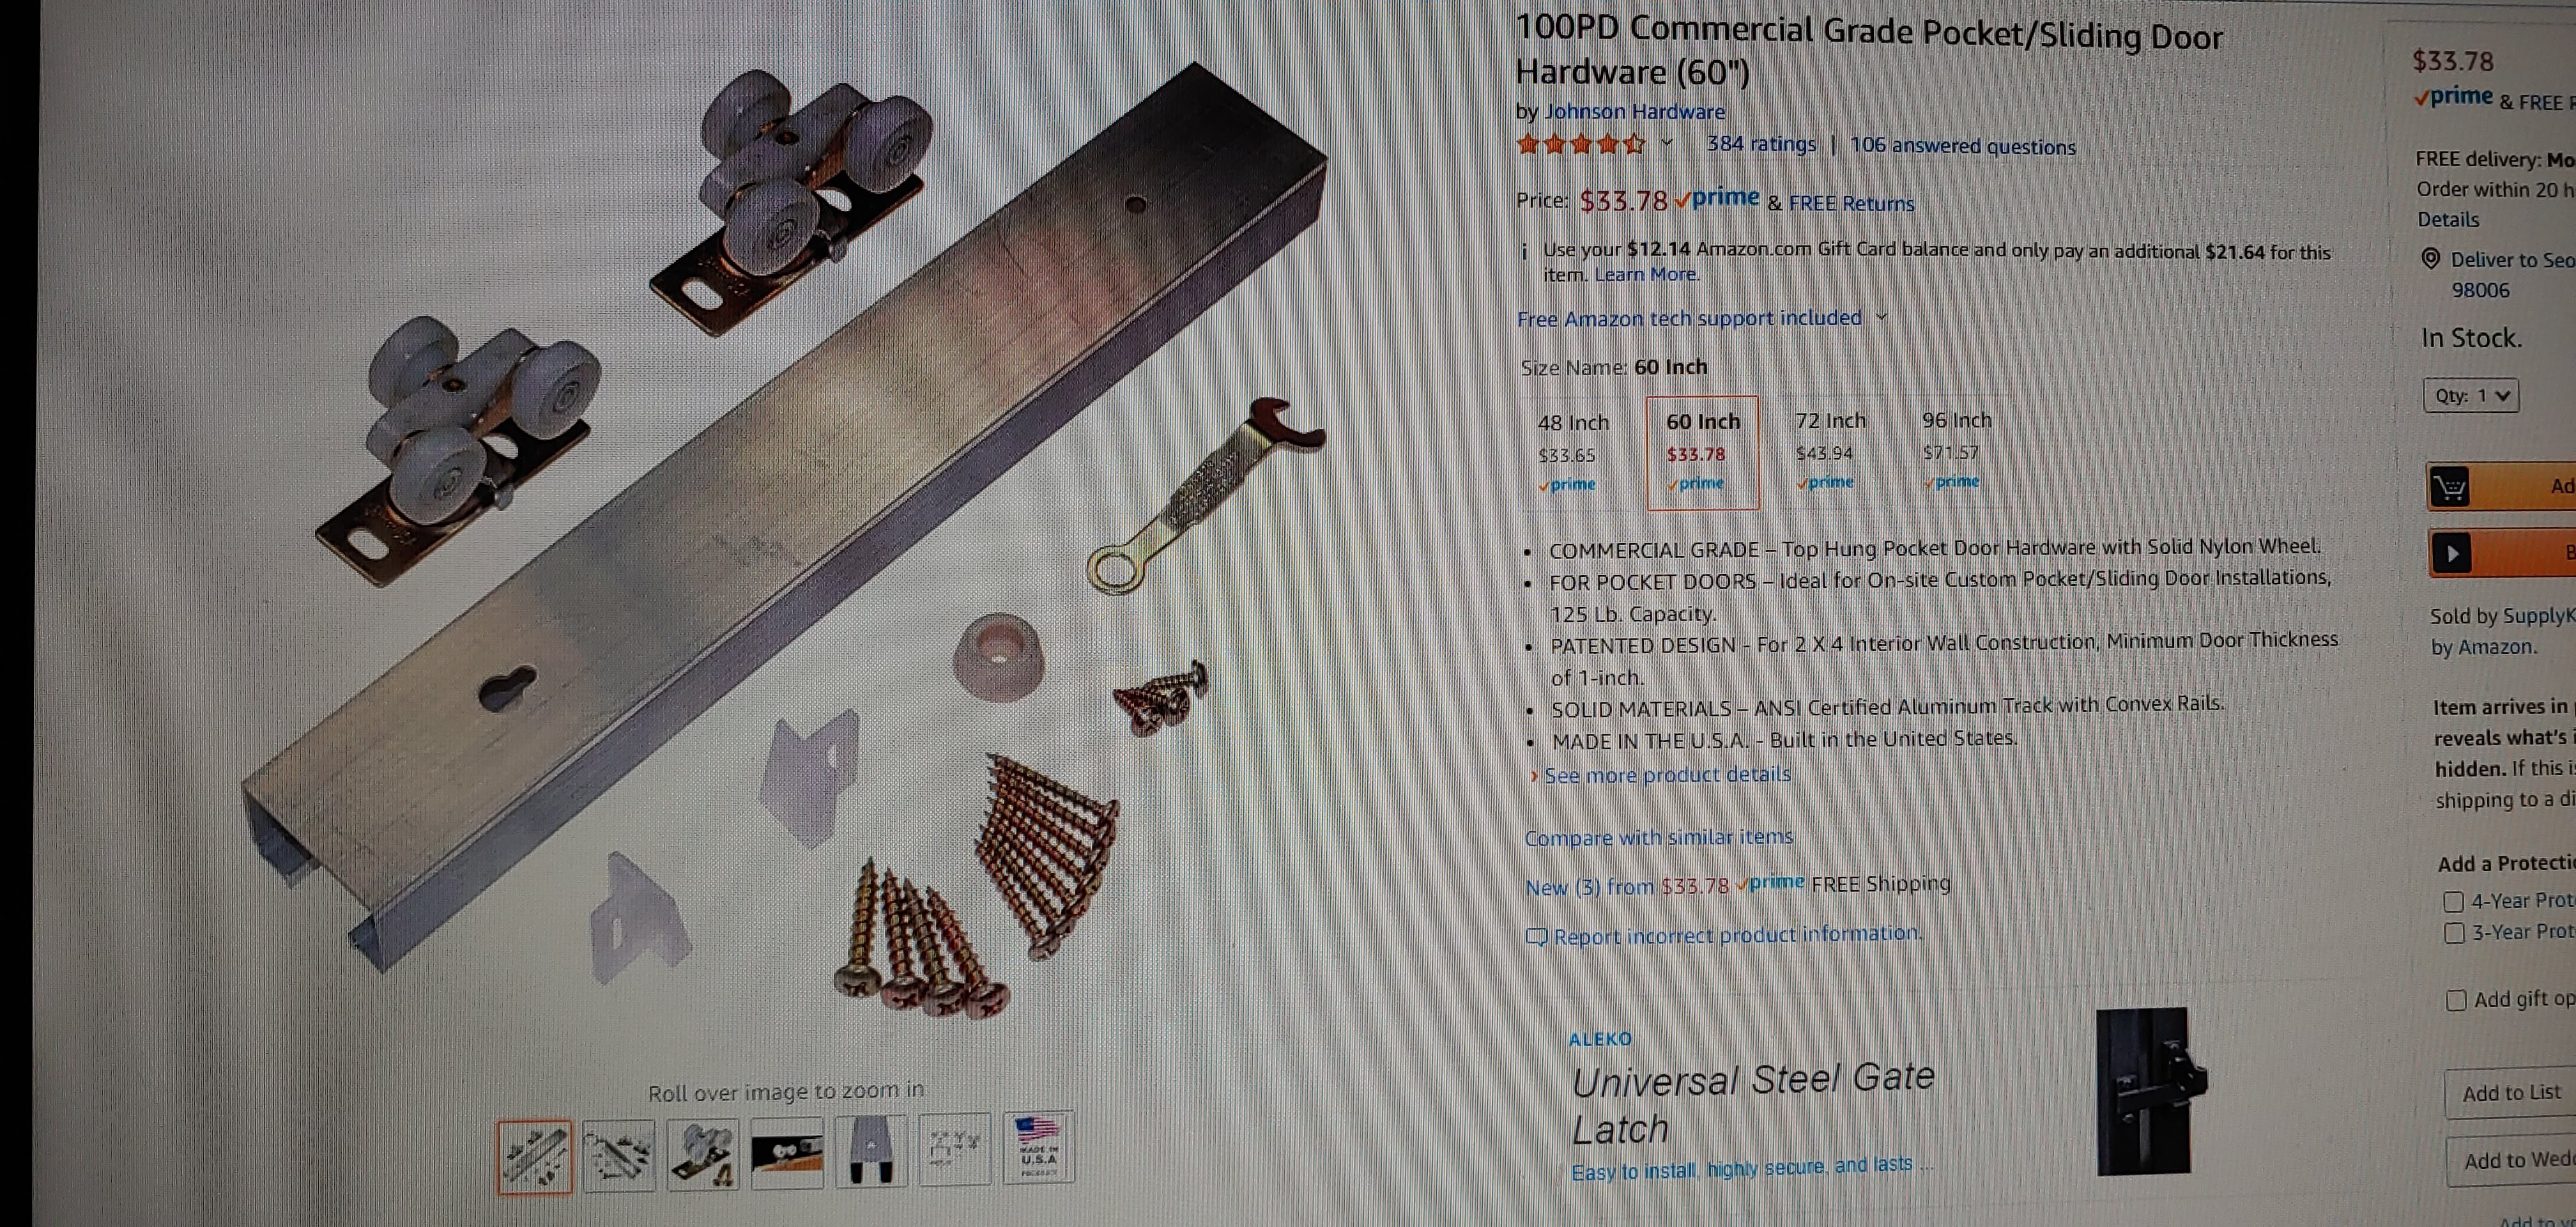
After some thoughts and research finally I decided bought the new rail set and decided to cut off the wall to exchange the rails – Journey started…
Order a new rail set with much solid top down hanging style, some wall cutting tools, and stud finder
Tear off the frame of the door
Pullout the door
Cut the dry wall to have some space to pullout the old rail and attach the new one
Pullout the old hanging parts attached at the door and installed new hanging parts
Hang it! – but failed as door did not move: New rail had a longer height so the door, which was already kind of oversize, was totally stuck at the bottom/floor. 😦
Detach the door & hanging parts again and cut a half inch of door with saw
Reattach the door and hanging parts
Adjust the door for, finally, a complete close – as I reduced the height of the door now everything became ‘within range’ of adjustment on how the door hangs 🙂
Pulled out not-working stopper & added the new stopper at the inside of the door
Reattached the frame of the door
Re-cover the open dry wall – attach the wood (via screw) at back of the opened spot and cover the part I pulled out and screw it down
Fill the gap with wall mud and paint – looked ugly so had to fill the gap again + add orange peel and repaint -felt like a plastic surgeon.. 🙂
Now need some final paint touches on the bare spot revealed during this process 🙂
Ha… what a journey!
2020.1
이사온지 두달만에 애들 친구들이 와서 밀고 닫아야할 미닫이문을 밀어버리는 만행의 과정에서 망가져 마음 한편의 아픈 손가락이었던 우리집 포켓 도어 (미닫이문)… 밀고 닫는 과정에서 자꾸 레일에서 문이 이탈하고 완전히 닫히지도 않고….
몇년전엔가 한번 작심하고 롤러를 교체하는 걸로 고쳐 보려했는데 얼마안가 다시 또 실패.. 결국 레일의 문제였다.
그냥 문 뽑아내고 매꿔버릴까, (문기능 상실) 외부에 barn style 미닫이문을 달까 (혼자 뜬금없이 bran style) 고민하다가 결국 그냥 있는 문을 수리하는게 제일 보기 좋겠다고 결론 내렸다…
암튼, 결국 Youtube와 이런저런 인터넷의 정보를 조합한 결과, 레일의 문제는 교체가 답이고 교체하려면 결국 벽을 뜯어야 한다는 난관에 봉착하다… 결국 저질렀다.
문을 뽑아내기 위해 문frame 장식 제거
문을 드러내고 문옆의 벽을 뜯어냄
뜯어낸 벽틈으로 레일을 고정하는 나사 제거하고 레일 제거
새 레일 설치
새 레일에 맞게 문을 걸어주는 장치로 문에 설치하여주시고
문을 달았다.. 허나.. 새 레일이 두꺼워 문이 바닥에 걸려주심 OTL 헐…
결국 문을 위 아래로 조금씩 톱으로 잘라주고 걸어주셨다… 드디어 몇 년만에 미닫이문이 완벽하게 닫히기 시작..ToT
문 frame 다시 달아주시고… 기존의 문이 틈에 먹혀버리던 문제를 해결하기 위해 레일 안쪽에 나무한겹 + 고무하나 달아주셨다..
가장 문제인 뜯어진 벽 다시 붙이기.. 고정을 해주려면 결국 뒤에 나무판을 대고 나사질을 해줘야해서 나무자르고 뒤에대고 나사를 박아 주시고… 뜯은 부분을 나사로 고정해주심..
그랬더니 자르면서 유실된 부분을 매꿔야 함…ㅎㅎㅎ
벽 구멍 매꾸는 mud로 하고 texture살리는 거 뿌려주시고 페인트칠하고를 한 두세번 반복.. (성형수술..ㅎㅎㅎ)
뭐 이정도면 대놓고 보지 않는 이상 티 안나게끔…휴…
이제 남은건 문 깊이 조절하고 새 레일 설치하는 과정에서 보이게된 부분, 다시 붙인 frame중 칠이 떨어져 나간 부분들 흰색으로 마무리만 해주심 된다.
결국 몇달간을 거쳐 이것저것 사고…ToT, Youtube 보면서 연구한 결과 나름 아픈 손가락을 어쨌건 고쳤다,,휴… 그리고 이젠 왠만한 미닫이문 문제는 다 해결가능한 수준으로 등극..ㅋㅋㅋㅋ
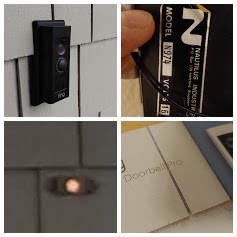
Another “Black Friday bought but delayed installation” Ring Doorbell Pro is finally installed.
As usual, after getting over ‘here and there of unexpected challenges’, and good fellas who shared the workarounds in Reddit, now my home got smarter smarter day by day… Am I being smarter as well?
햐… Black Friday때 사두고 미루고 미루던 현관 벨 삽질 끝에 교체… 하라는 데로 했는데.. 항상 그렇듯 쉽게 되는 일은 없다.
하라는 건…
집 내부의 초인종에 전원공급장치 연결
기존 외부 벨 버튼을 뜯어낸다
Ring을 연결한다
끝
지만…결국은…
집 내부의 초인종에 전원공급장치 연결
근데 뜯어보니 내부 초인종 한쪽의 나사가 헐겁게 달려있었다..-.-; 이거 똑바로 다는데 한 30분 소요…
기존 외부 벨 버튼을 뜯어낸다
뜯어내보니 기존 내 벨을 siding 때문에 옆으로 되어 있어서 엽기적으로 옆으로 달거나 수평하지 않은 바닥에 달아야함
Ring을 연결한다
연결해보니 우리집은 내부 초인종이 두개인데 연결하고 났더니 전원공급장치가 안 달린 하나가 아주 굉음에 가까운 소음을 내 주신다… 그리고 벨버튼을 눌렀을때 기존 벨소리도 같이 나야하는데 기존 벨소리 두군데서 모두 실종
인터넷을 찾아보니 나만 그런거 아님…-.-; 다들 답없다라고 함..헐
혹시나 해서 전원공급장치를 굉음을 내던 녀석에게 달아주니 원래 달렸던 녀석이 굉음으로 신음… 여전히 기존 벨소리는 둘다 실종
결국 다시 전기공학 및 기계식 벨소리원리 (벨을 누르는 과정에서 전기가 통하고 기계에 전원이 공급되어 소리를 내는 구조) 를 공부하고 전원공급장치는 원래 달려있던녀석에게 달아주고 원래 굉음내던 녀석은 과감히 기계를 bypass하고 전기선을 직결해버림 (이게 인터넷에서 답없다는 사람들이 대부분 한 solution)
결국 이제는 기존 벨소리도 소리나기 시작함..휴..
수평하지 않은 외부 Ring base를 어케할까 고민하다가 일단 사이를 띄어 놓은 채 연결하고 사이를 메꾸는 나무를 제작하기로 결심…-.-;
수치재고 나무를 자르기 시작했으나 잘 안되고 원체 작아서 결국 작업중 부러져 주심.. (아 수많은 작은 톱질과 사포질의 결과가 조각으로 산화…T_T)
그냥 비어있는 공간을 shim을 여러개 박고 끼우는 solution으로 변경 – 하나하나 shim박고 잘라야하는 수치 check하고 외부로 보이는 부위는 Ring 색에 맞게 페인트 칠하고 다시 끼워주심…
삽질의 결과 Amazon하고 Lowe’s/Home Depot 또한 더 솔솔하게 돈벌었다.. 나날이 똑똑해지는 집처럼 나도 똑똑해져야할텐데…-.-;
Finally installed the Smart Garage Door Opener ordered during Black Friday as end of year project 🙂
Fairly simple. Connect the little pod to opener, install the sensor at door & the wall close to door when closed (to communicate), and wireback that to pod, power the pod + Wifi connection to pod.
Now, the “2 nights and 3 days of summer camping with garage door opened” shall be the past thing in future..
간단한데 구찮았던 Garage Wifi Opener 드디어 설치했다.. 뭐 공부좀 하고 (저게 열리는 열고 닫는 원리는 합선이란것도 공부하고..ㅎㅎ 전기공학 하는 사람들 천잰디 하고..ㅎㅎ 전기공학이 아닌 기계공학인가?) Black Friday에 $20에 나온 걸 사서 삽질 좀 하다 달았다..휴..


